


Denny Hulme

by Phil Wicks
The Denny Hulme – Bruce McLaren combination proved invincible in the 1967 Can– Am series and you could be forgiven for thinking it was a two horse race. Only three M6a’s were built and the 5.8 litre Chevrolet engines with Lucas fuel injection proved to be unapproachable. Before the start of the season, Robin Herd was given eleven weeks to put Bruce’s ideas into practice and the aim was to knock the Lolas from the top spot.
So here we are, another Monogram model and another potential racer with more problems stopping it becoming one. Looking across the board it seems to me that slotcar makers in general make good slotcars; and model makers, both diecast and polystyrene, make good models, and never the twain etc. etc. A couple of model makers, Revell / Monogram and Autoart to be precise, have ventured into sacred slotcar territory and to be honest have produced some very nice slotcars. But they haven’t yet managed to make some very nice slotcar that could win out of the box! (Excluding the Revell Trabant and Simca, which are untouchable in their class!) I think if they were to take on board some ardent racers as part of their R&D team, maybe this could be changed. But, they are getting there. A case of two steps forward with one model and one step back with the next.
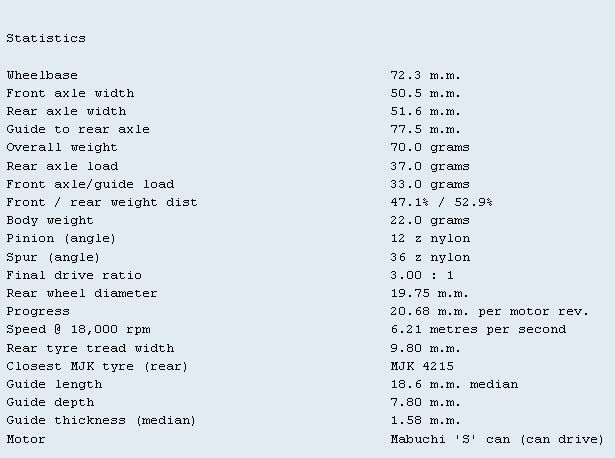
I would like to think this model is one of the forward steps in their products. What do we have to cause me to say this? Well, just check out the specs below and all will reveal itself. The gearing is 12/36 which translates into 3 : 1 for a start, and anyone who races short to medium circuits will agree this is not necessarily the fastest ratio but certainly the most versatile. Perhaps that’s why 90% of the market leaders use it! Next it is 70 grams of low down weight but this is partly off set by the average traction magnet. But then again the tyres seem awfully soft to me and maybe these will be a saving grace for it? And then there is a guide which is almost 8.00 MM deep, what the!!
So getting back on track, what I intend to do is review the model then take a stroll through the ways I would improve this model for its designed magnet track racing. Follow me!
To enlarge the screen, right click the picture and select 'watch on Youtube'
When I opened the box I immediately took a liking to the model. It was a bit like when I opened the Cooper Cobra, the first attraction is the subject matter which no doubt has accounted for seventy percent of its sales. Any McLaren Can Am car has been a long time coming and with the dubious scale of the Vanquish model and the price tag of the HSRR model, the Monogram lands fairly and squarely in the middle ground. Well priced, well modelled and well…….driveable? we shall see.
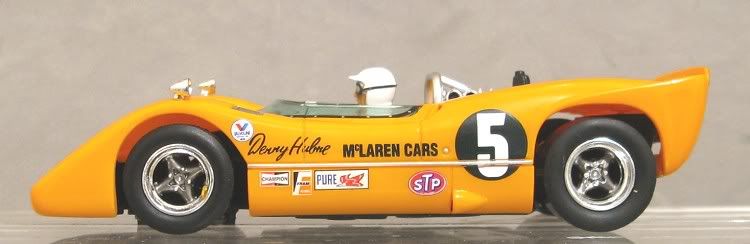
McLarens were finished in Papaya orange, and this model is a very nice orange, and I don’t care if anal slotistas say it’s the wrong shade, because not many know…..or care! But I will say it is a bit pastelly in tone which is a bit off putting for a grunt machine. The body material is orange plastic and there are signs around it which show it has been painted and clear lacquered.
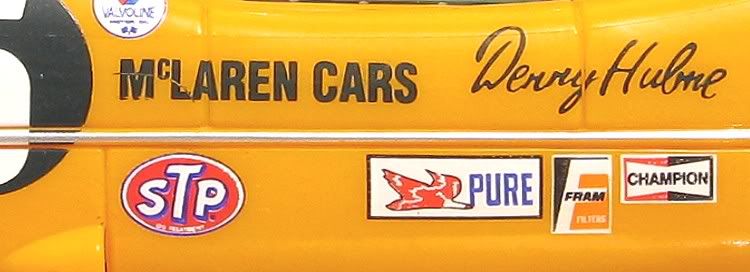
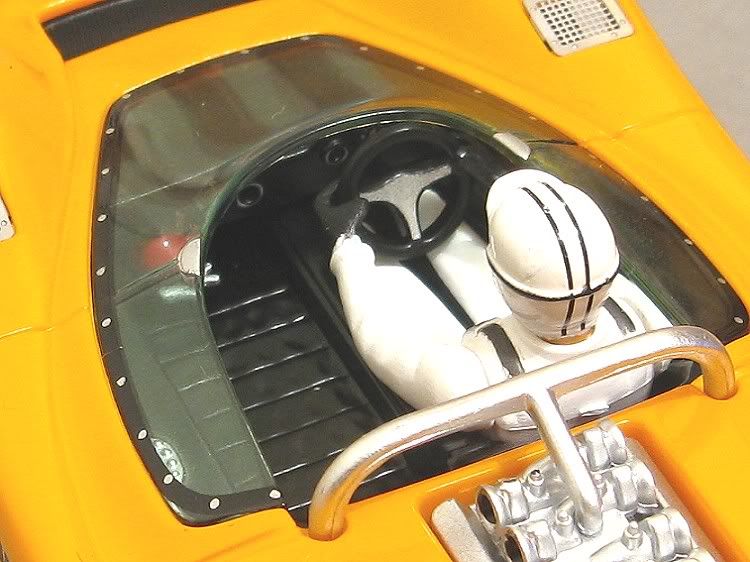
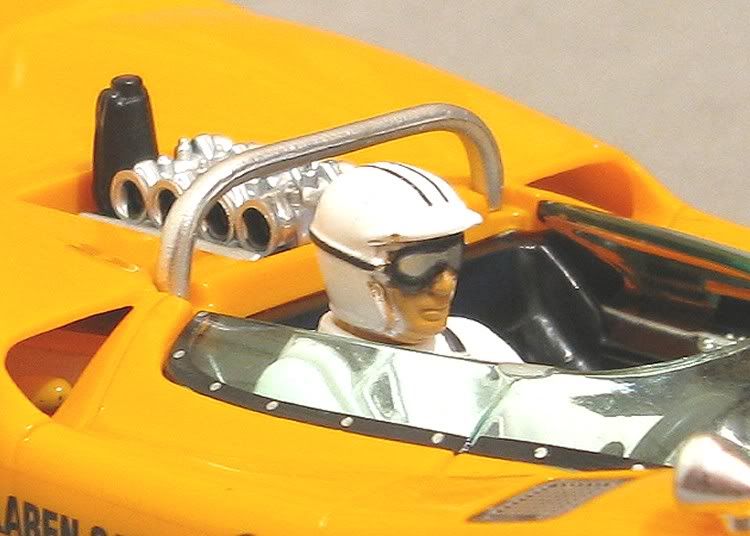
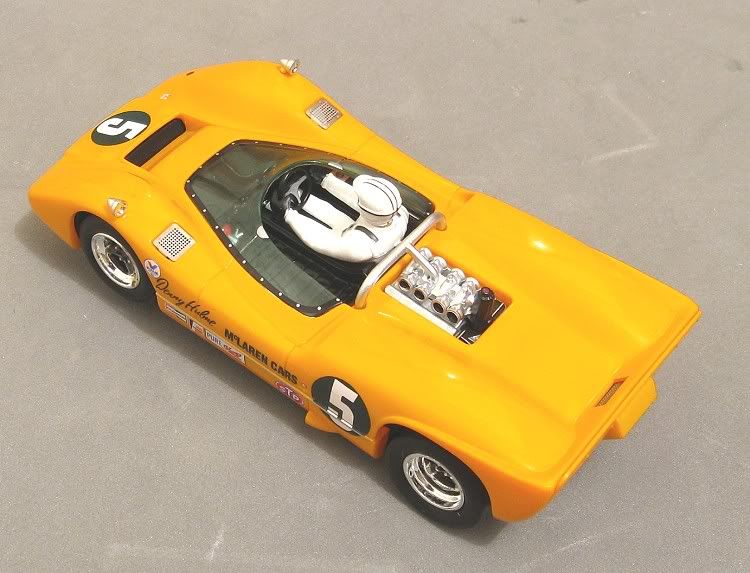
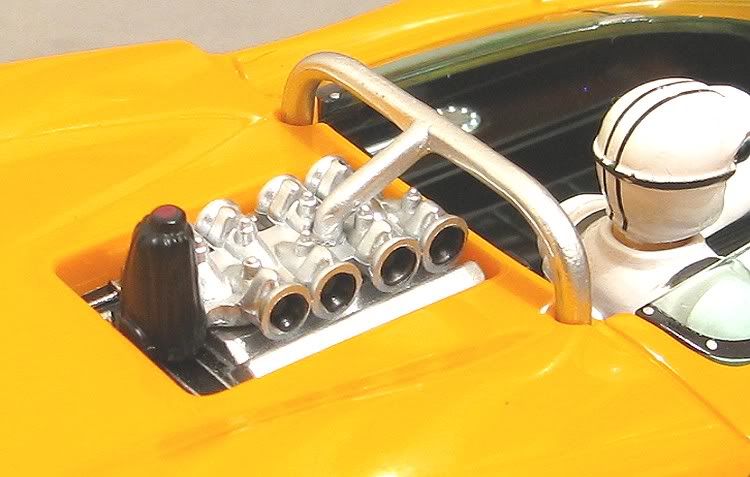
Tampo is good, but the side decals are just a bit fuzzy on close inspection. The screen and cockpit are well detailed but the cockpit is a bit shallow for the model. Had Monrevellgram changed their style of traction magnet it may have generated enough space to improve detail here. Nonetheless, a very nice interior with dash detail.
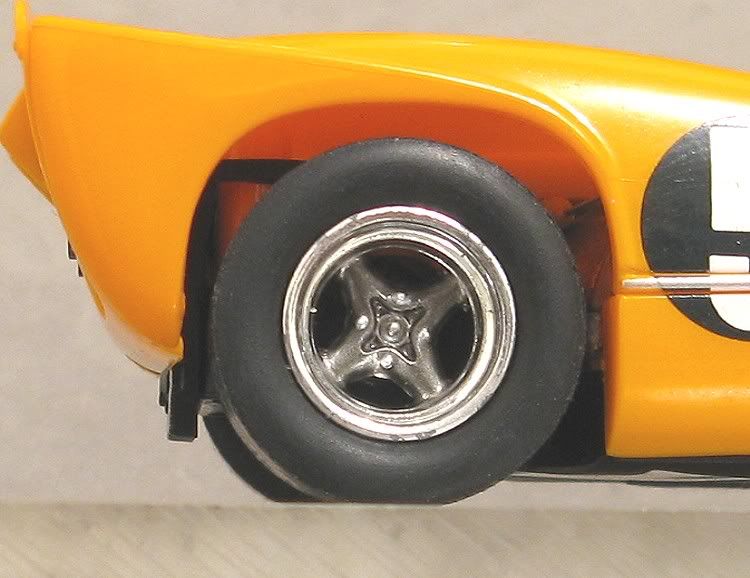
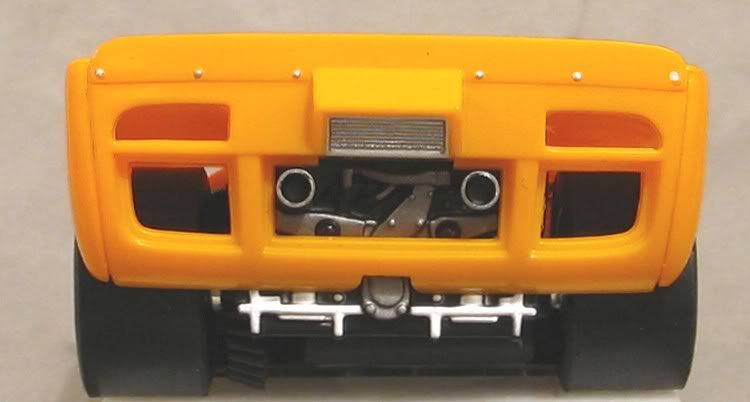
Moving back there is the engine intake detail which is nicely modelled too but the detail which makes me smile inwardly are the photo etched parts on the front wings (guards, fenders) and the oil cooler on both side of the rear spoiler. The model also comes with a pair of wing mirrors which look very vulnerable! Wheels, well what can I say, I’m a softy for nice wheels and these are nice wheels, even if they aren’t exactly concentric! Unfortunately you heard correctly.
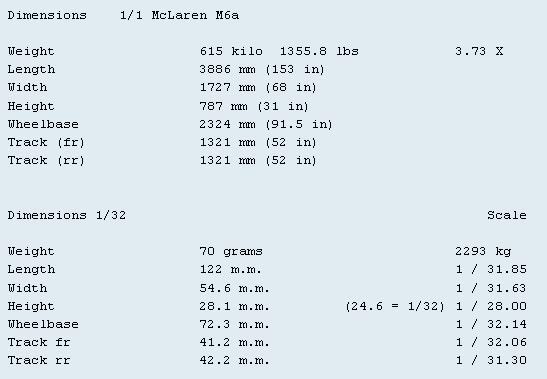
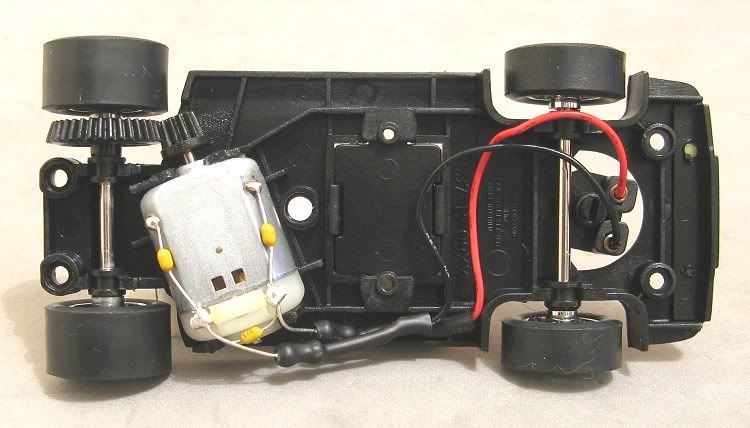
Underneath we can inspect the business end of the model. An angle winder which to me looks a little one sided. I couldn’t get an exact measurement on my digital scales but the side to side weight difference appears to be in the region of six to seven grams. There is the usual adjustable Monogram magnet in the forward position and that humungously deep guide which will exclude it from SCX and Scaley tracks, out of the box! My first impressions, having already played with and raced the Carrera M20, is that it looks so small! So, onto the internet in search of its specs for a comparo, and this is what I found:
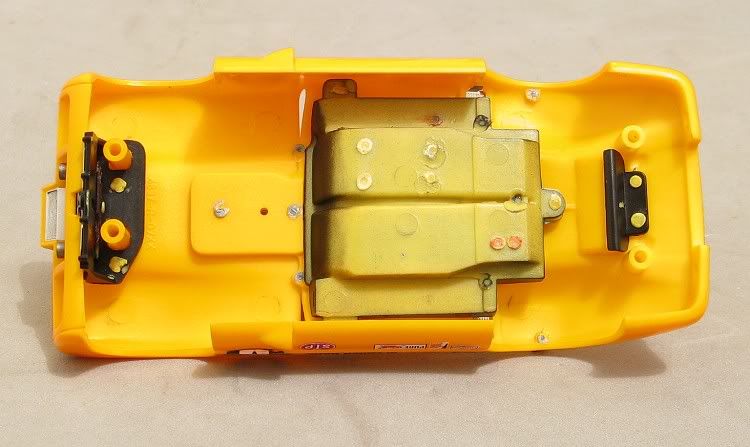
Four very nice screws hold the body on and these mustn’t be confused with the two which hold the magnet in. They have a smaller gauge thread and will pull through if put in the body mounts. The easiest way to differentiate between them is that the magnet screws have smaller heads on them. Inside is a very rugged chassis with plenty of reinforcing moulded in; especially around and behind the motor where other makes that spring to mind are sadly lacking. But there is a vulnerable spot to the chassis. That is the guide mounting tube. This part of the chassis is decidedly thin and not up to the job, but there is room to reinforce it and that’s what I will be doing.
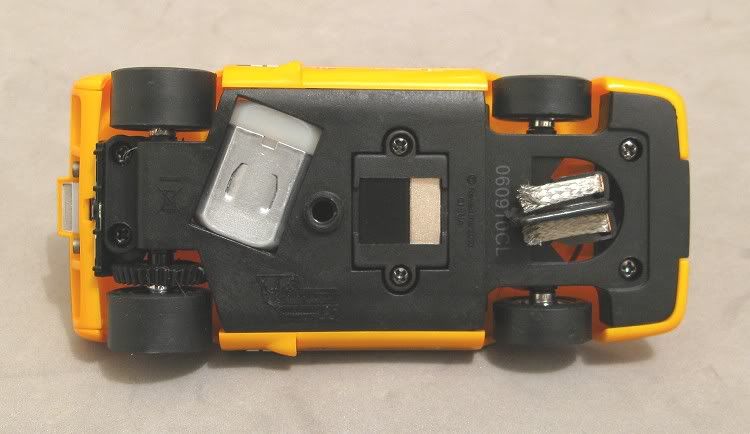
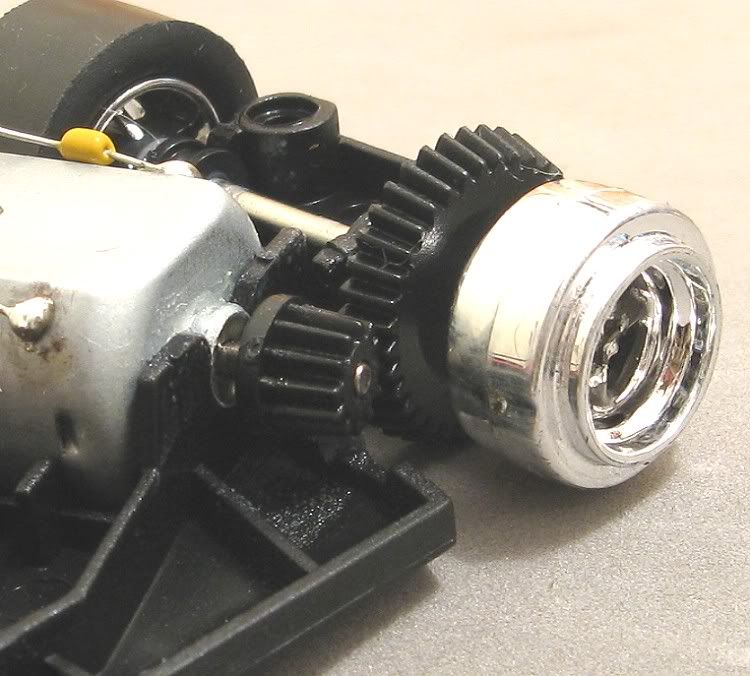
A robust pinion and spur gear adorn the drive and everything is firm and immovable…..except for the motor! There is enough grip in the motor mounts for magnet racing but I fear that for non magnet and board racing there my not be quite enough. No matter, I have bought this for magnet racing and I’ll continue in that vein. A very cute model and one that just looks good in the hand and feels good too. But if this is going to have to earn its living in the field of slotcar conflict, what needs changing…………..? Are you sitting comfortably?
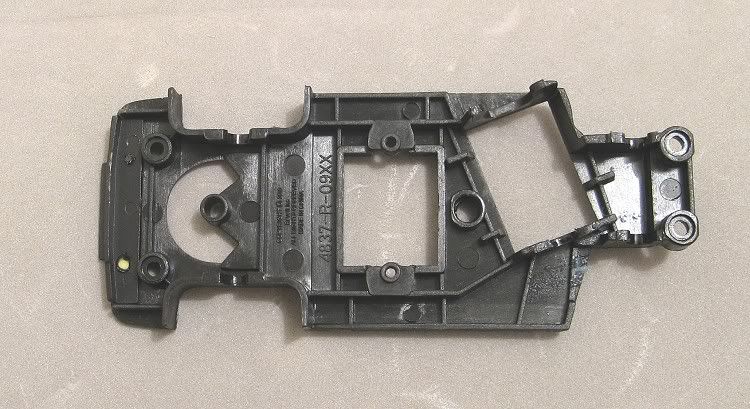
One of the first things I noticed was that the body was under stress on the chassis and with the screws out the body rocked ominously from end to end. Something was binding or fouling, or at worse, something was out of shape. I also noticed that when placed on the set up block, opposite wheels were clear of the board! Chassis bent?? Without continuing I decided to do a ‘from the ground up’ rebuild. The model has obviously been assembled straight from the moulds but the individual parts straight from the moulds could well want blueprinting to ensure a good fit.

Everything was stripped from the chassis and the chassis was offered into the body. No problems, the chassis was a good even fit into the body. Next up was the guide and the front axle. Again not too much worry here. Next was the rear axle and this is where things started to show up. The rear axle wasn’t slotting fully into the bearers in the chassis.
This was caused by moulding flash on the nylon bearings and on the bearers in the chassis. I scraped the flash marks off the axle bearings and trimmed either side of the bearers. The axle was refitted and sat squarely in the chassis. There was still a slight discrepancy but repeating the process with the front axle bearings cured the problem.
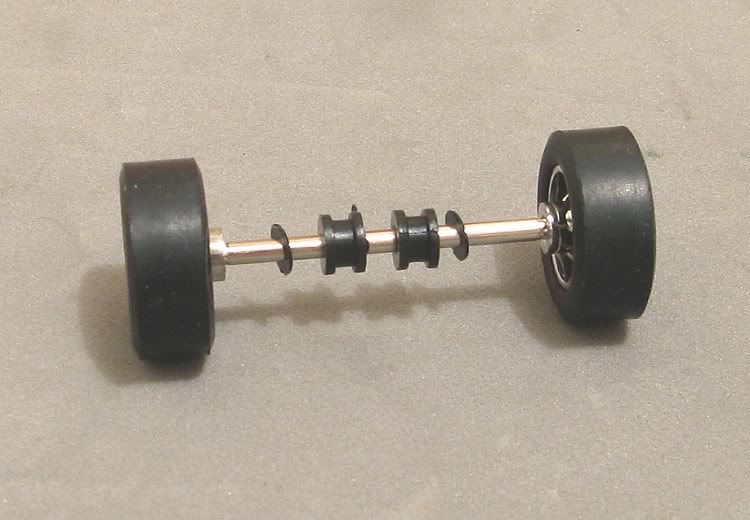
An interesting observation would be that Monogram have gone to the lengths of fitting shims to the front axle to minimise end float! While working on the rear end I noticed the axle had a rhythmic clicking when spun. This was cured by cleaning up the inside face of the right hand wheel hub which had some rough edges to it. The chassis and axle assembly was fitted back into the body and it fitted snugly on the body mounts. Time to move on.
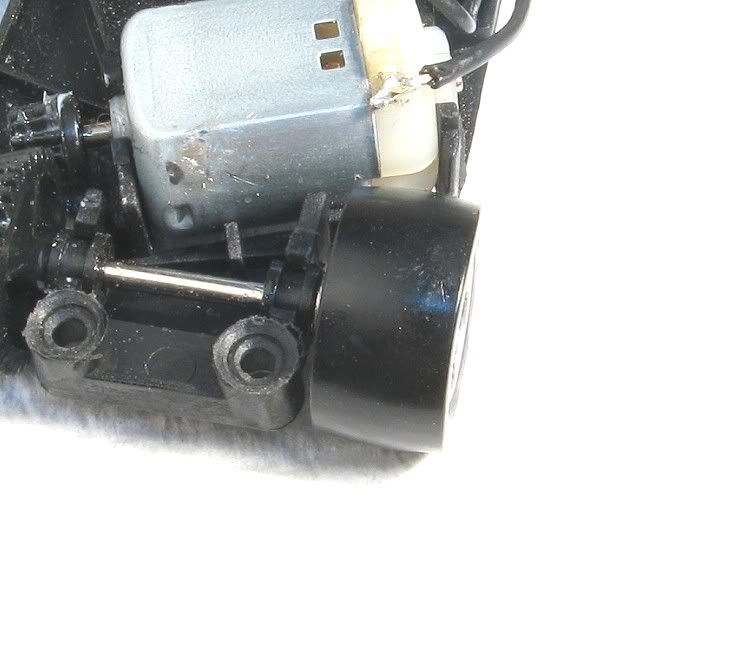
Next was the motor. This was clipped into place and the first problem was a binding gear mesh. The rear axle was a bit stiff. There was no backlash at all between the pinion and spur and the spur gear obviously had a high spot as it would bind in the same place each revolution. I ran the drive at low speed after applying a little Tamiya fine polish to the gears and the motor noticeably increased in speed with time. After a couple of minutes I washed the polish off with water and applied a small amount Vaseline. The gear was still binding a little and the final fix was to slide the pinion down the motor shaft just enough to generate a little slack. The result was an appreciable increase in motor speed. Problem one solved.
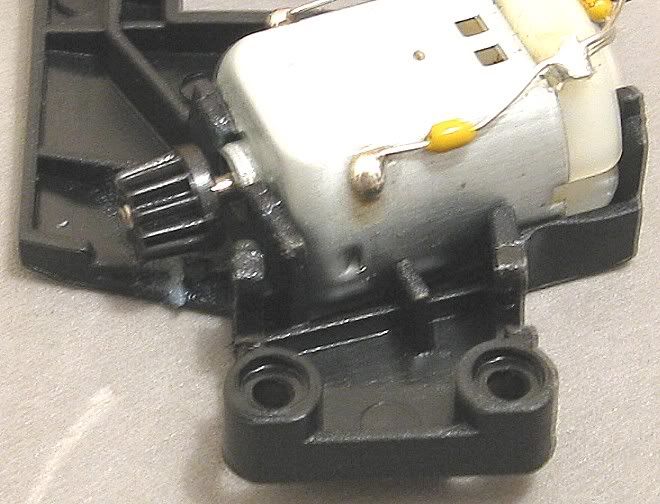
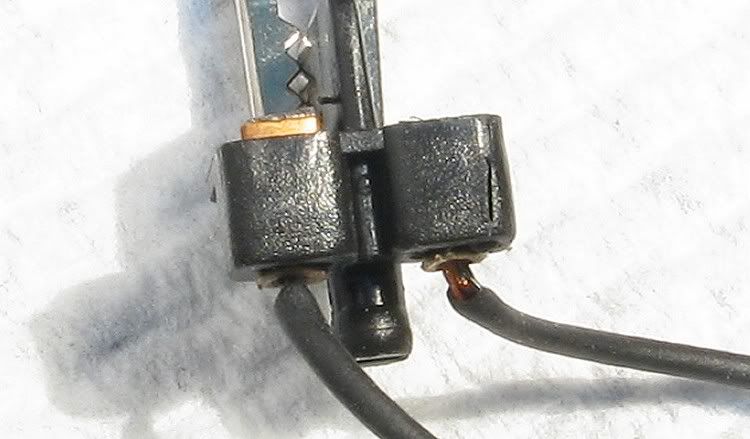
Next up was to retry the body. Once again the chassis was unable to slot straight into the body, so something to do with the motor was at fault. After looking round I decided the RI components on the front of the motor were contributing to the problem. The components and lead wires were completely removed and the problem was reduced. Next up I removed the solder from the motor terminals and this allowed the chassis and motor to slot into the body neatly. Mmmmmmmm? I decided to fit some new lead wires as the existing ones were now too short with the components removed.
Both eyelets were removed from the old leads simply by applying the soldering iron and pulling the wires out of the flattened eyelets. Both ends of a length of lead wire were stripped back four m.m. or so and tinned. With the iron on the eyelet, the new lead wire was slipped into the eyelet and then left to cool. The wires were refitted to the guide and the wire cut to length, stripped and tinned. I placed the tinned ends of the wire under the motor tags and soldered them in place. The solder on the top of the terminal tags was filed off and the finished job offered into the body. The front motor terminal had been fouling the body but now was clearing it by the smallest of margins. Another job jobbed!.
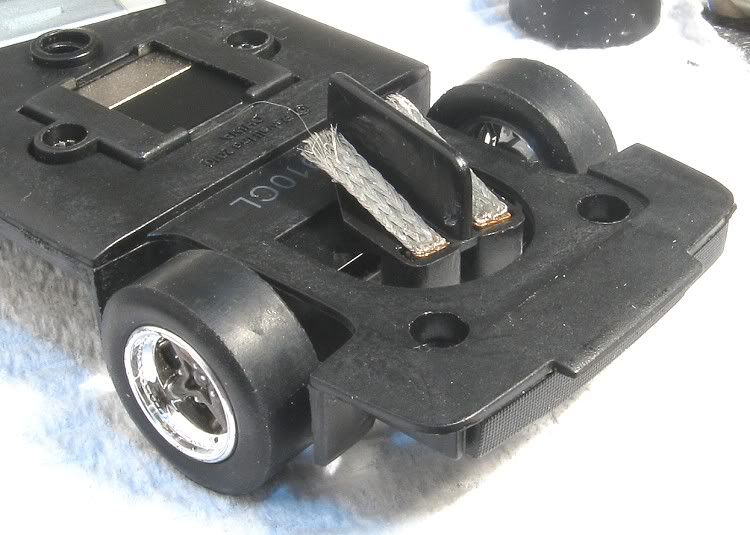
Next……. The guide! So what’s wrong with this? Not a lot really but just something I have issues with on Revell and Monogram models. These models have the quick change braids and in doing so R/M have made them so the brass endcap/tensioner on one end doesn’t go fully into the guide. The net result is that after running the model for a little while it becomes obvious that the front of the model is running on the front of the braid and the brass cap.
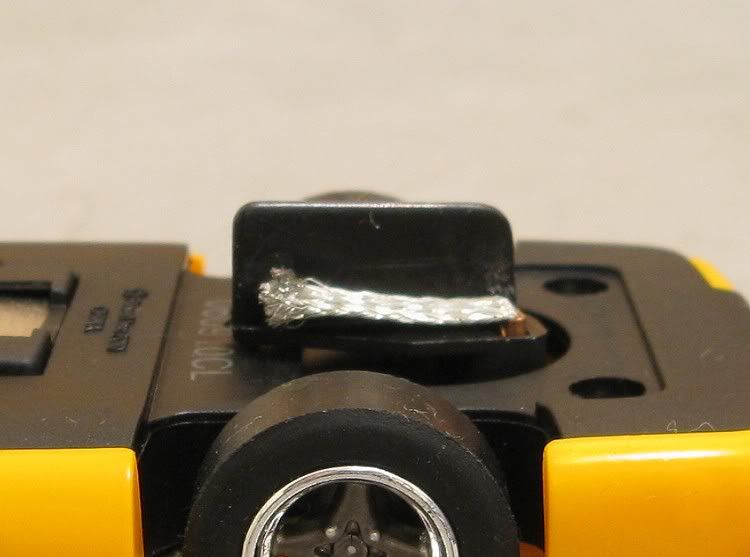
I wanted to raise the front of the braid and allow the full braid to do more work. The solution! To open up the front of the braid slot at the top. This allows the braid to come further through the guide and eliminate the brass bits from showing under the guide and touching the track rails.

One of the things I like to do with all models is to let the body float on the chassis screws. This model is one of the many that have the body posts going into recesses on the chassis posts, and therefore movement is restricted by this. The simple solution was to use a six m.m. drill bit and turn it by hand to countersink the chassis posts. Done carefully, this will allow unrestricted body movement with the body screws backed off a turn. Finally I applied a coat of clear enamel inside the post screw holes. This helps grip the screws and stops them working loose on the track.
While the model was still apart I decided to tidy up a couple of things. Firstly, the leadwire can stray and become trapped between body and chassis, so a small spot of superglue on the side of the chassis wheel well and the wires were spotted to it, never more to move. I also ran the rear axle without tyres and lightly trued the rims and the centre ridge. This has a bit of a convex face to it but with the original tyres fitted it isn’t noticeable. I tried out MJK tyres on them and with the ones that closest fit, there was a tendency for the tread area to become convex too. A simple sanding should eliminate this though and the 4215 Panoz tyres should be the best fit.
I managed to true the eccentric rear hub sufficiently to keep runout to a minimum but one of the front wheels was less than satisfactory and some careful sanding will be required to get it back into shape. Lastly a minor alteration was to apply a 40 watt soldering iron tip to just under the wing mirrors while keeping some upward tension on them. After twenty seconds or so the mirrors pulled free complete. These will be kept in the display case until the model is retired and then they will be restored to the model. And with the model in blueprint condition, all that is needed is to give it a good magnet track work out! That will be a few weeks away yet.
Stay tuned.
So there we go, another model which should be able to acquit itself on the race track, but time will tell. If the traction magnet proves inadequate it shouldn’t present too much of a challenge to improve it and we should then have something to be pleased with.

