


By Ocar
By Phil Wicks
For a long time there has been a shortage of variety in the 1:32 scale hard body market for the scratch building slot racer. Over the last four or five years thought things have started to loosen up a bit and at the time of writing I would guess that you can now obtain most popular bodies from all eras.
My first attempt at building a resin body into a slot car was the a2m version of the Mercedes 196. I purchased it from the makers via the internet along with a Ferrari D50 body. I was apprehensive at first as these bodies do weigh in at a premium . The DBR1 is 40 grams. But in perspective they are positively lightweight when compared to some of the latest RTR plastic bodies complete with lights and circuitry!

The Mercedes went together well and with an SCX motor is a pleasure to drive and on the local board tracks is as quick as other cars in its class, so recently I emailed John at Classic Slot in the UK and got a ‘to your door’ price for the Ocar Aston Martin (and the MK1 3.0 litre Capri!). John does a whole host of resin bodies and I’m sure I’ll be trying out some others. The body turned up in about seven days and after sitting on the bench for a while whilst clearing the backlog of model conversions and repairs, I eventually set too it.
First task was to fettle the body into the version I wanted. The model supplied is of the Le Mans version and comes with rear spats over the wheels. Using a dremel type tool I carefully removed these and cleaned up. The mounting points cast inside the body are next to useless so these too were removed. The body too was an irregular thickness and using thumb and forefinger in a pincer action, I determined the thickness all over. I then proceeded to grind away at the inside of the body till I reached a happy medium thickness.
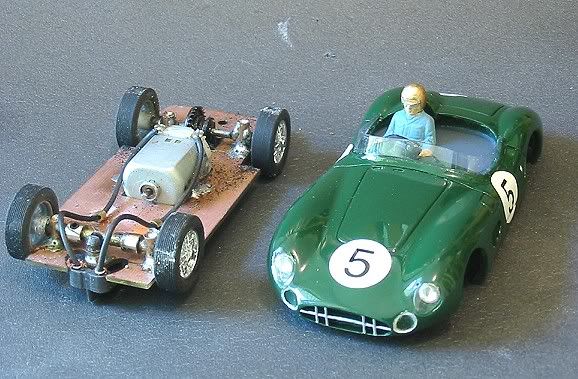
At this stage I wanted to finish the wheel arch profiles so it became essential to have the chassis made up to establish where the wheels would fit exactly. The chassis was to be the now tried and tested pcb with ‘Wixle’ front end and Ninco sprung guide. Body details were measured to establish axle width and wheelbase. The square chassis was cut and fitted to the body before the wheel wells were marked and cut out.
The model will run on all fours to reduce rolling resistance and the axle mounts are the now familiar ‘T’ posts. Once the rear axle was in place the motor hole was marked out, cut and motor mounted. The wheel arches in the body were then cut to match the Ninco Classic 7mm wide tyres. Last job before paint preparation was to cut the pcb at the front and mount the guide allowing about 2.0 mm up and down movement then cutting into the front valance of the body to allow clearance to the guide. The two mounting posts were screwed to the chassis and were gradually trimmed until the chassis sat well in the body. The bottom of the posts were scored and side drilled and the points on the body where they were to go were cross scored quite deeply and they were epoxied in place with full strength epoxy (not the quick drying stuff!). All this was to reduce the risk of them breaking loose at a later time.

The Ocar bodies are a pretty good likeness but the ancillary equipment lets them down. The windscreen is the first disappointment. It wasn’t going on in a million years so a thick paper screen was cut first and trimmed to fit. This was laid over some clear plastic sheet which had masking tape applied. The screen was traced round, cut out and then fine trimmed to fit the body. The screen curvature was achieved by holding the parts to be bent above a warm soldering iron and without overheating it, bent slowly to profile. If you try to bend it cold you will end up with ‘cloudy’ corners.
The driver body and head are old Airfix parts. The arms were cut to allow bending and the helmet was reshaped to look more 60’s and a bigger peak was glued in place. On this model I didn’t bother too much with dash detail and the Tacho on the dash had a quick coat of silver paint.
The headlights and driving lights were the next problem. The kit comes with a couple of plain old injection moulded clear parts. No headlamp covers or anything! My solution? The scrap box revealed a couple of headlamps from an old Fly Porsche of some sort. These where cleaned and after the body had been painted, the light recesses were counter sunk and a 3/32 hole was bored right through the back of the recess. The lights were then clear epoxied into place. I didn’t bother with the driving lamps and some illustrations on the net showed these to be blanked off in many cases, so I filled them with clear epoxy and painted some rims on them.
Before the body was painted, all visible defects were removed or filled. The door and seams were picked out with the tip of a modelling knife. The body was then rubbed down with 800 wet and dry to impart a key to the surface. The paint on resin bodies will chip easily if basic preparation is not carried out. The body had its first coat of grey and all the defects that showed up were dealt with. Next the first top coat was applied and checked for defects. Again these were fixed and the last top coat was sprayed. The body then had a coat of clear and was allowed to dry for several days. Next were the few decals it does have. Number roundels and numbers plus painting the chrome parts like filler caps etc. Again after a couple of days drying the first coat of clear was applied. A couple of light rubs to remove any drift in dust and the last coat of clear. I put this on quite thickly and as the body was mounted on a ‘lolly’ stick, I could rotate the body during its first five or so minutes of crucial drying time to prevent runs.
The body was then left for a couple of weeks to let the paint ‘cure’ as there was to be a bit more handling yet. When ready it was time to make the headlight covers. These were made from clear plastic once again. A small sheet of clear was wrapped around the handle of a modelling knife and heated up with a hair dryer. Once done, the cover profile was cut oversize and gradually cut down to a good fit. Once to shape, the opening had a fine bead of clear epoxy applied and the lens was placed in position. The second lens was glued and the model was left to set.
Next was the screen. On this model, the screen sits in a recess which greatly facilitates the easy fitting of the screen. The screen bottom edge had a bead of clear epoxy applied and was then put in place. A couple of thin strips of masking tape held the screen in place during the drying process.
So, after all the preparation it was time to give it a run. The first mod was to the inner front arches. I like the two screw mounting idea but it does allow a bit of body roll and in this case the front tyres were touching the inner wing area. A quick grind with the Dremel saw this fixed! Other than that there was little to fix! The model has an ‘S’ can Scalextric motor so It does have a good turn of speed. On my local board track it was almost an instant success. Some other minor adjustments to various clearances soon saw the model driving like a dream. I took the rough edges of the tyres and set the body screws so there was minimal front up/down movement and about 1.0/1.5 rear up/down movement. This also limited the body roll to allow the wheels to just clear the arches.

So, a few more hot laps and a very pleasing drive. At this time we didn’t have the lap counters on so I haven’t been able to do a lap time comparison but suffice it to say it is a very respectably quick model. The resin body wasn’t that much heavier after fettling and the whole model weighed in at 83.0 grams! No need to ballast this little model and the extra weight is spread throughout the body! The axles are wide enough too to counter any top heaviness it may have!
Specs.

Track						71.5 m.m.
Front Axle width				51.5 m.m.
Rear Axle width				        52.0 m.m.
Overall weight				        83.0 grams
Weight on Guide/front wheels		        41.0 grams
Weight on rear axle				42.0 grams
Front/Rear weight distribution		        49.4% / 50.6%
Pinion						9z
Crown wheel					27z
Final drive ratio				27 / 9   3:1

Once again I surprise myself with the turn out of these models. The DBR1 is a pleasure to drive and on board is comparable with other off the shelf RTR’s. I foresee quite a few hours running this at my local board track and the new track at Four Seasons SCC. There is one more model to finish before I build my own track once again. The track plans are already done and it has a lot of ‘high talent’ features and won’t be for the feint hearted. So, last model to complete will be the Surtees TS16/03 by Matchbox. This too is a great model currently unavailable as an RTR. Stay tuned!
